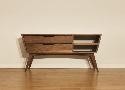
Outermost Chair


The Outermost Chair is a loving homage to the original Adirondack chair designed by Thomas Lee in 1903. That first design has spawned thousands of variations, but Outermost Home founder Chris Nagle wanted to return to the elegant, dynamic form of the original — timeless in design and constructed for endurance and longevity. Each chair is crafted of solid sapele mahogany, notched for structural integrity, and finished using stainless steel fasteners. All Outermost Chairs are crafted in partnership with Cape Associates Custom Builders, located on the Outer Cape.
Restore a Wood Entry Door - Fine Homebuilding
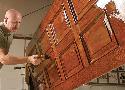
By Sean Clarke Issue 225
I’ll show you how to prep a wood door properly whether it has been painted or varnished, how to make minor repairs, how to apply an epoxy sealer, and finally, how to build up a varnish finish that yields a durable, clear shine.
DIY Cabinet Doors: How to Build and Install Cabinet Doors
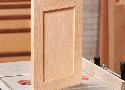
If you’ve got a table saw, here’s a new way to put it to work: making cabinet doors. You don’t need any special jigs— just your saw, large or small, a miter gauge and a sharp blade. And you don’t need any specially prepared wood; material from a home center will be fine.
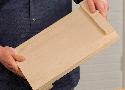
Make a Versatile Cedar Planter Box
I made my planter box out of cedar, which smells great and weathers very well. I kept mine natural to easily blend with any outdoor patio style. You could also paint or stain it to match your own personal style.
Garden bench
https://www.leevalley.com/en-us/discover/woodworking/2020/july/how-to-build-contemporary-cedar-garden-bench
How to Make and Use Router Templates
Learn how to make and use router templates when you are building your woodworking projects. Router templates can help you do three main things: First, they can help you trace complex shapes onto your project parts quickly and easily. Once you’ve got the template, you don’t have to lay all of this out again manually. Second, you can use your templates to actually make your project parts with a router and the right bits. And finally, you can keep your templates for possible re-use. That can save a lot of layout time down the road, if should you decide to make the project again.
Workshop Tip: Shellac conversion tables give ratios for small amounts - FineWoodworking
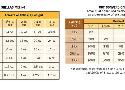
Further, I often mix up a heavier “cut” and then dilute some of it into lighter mixes for certain coats. That raises a second question: How much denatured alcohol must I add to turn a heavy cut into a lighter one?
I came up with these simple tables as a quick guide. Copy them and hang them in the shop. Then all you need is a scale to weigh your supplies.
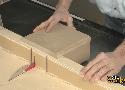
Make a Simple Bench Hook from Wood Scraps — The Family Handyman
A bench hook minimizes the need for vises or clamps, allows you to make quick cuts and the more sophisticated hooks make quick miters easy. We modified our simple bench so that hooks stop fence is shorter than the platform to help prevent tear-out on your work piece.
Finish Nailer Tips | Family Handyman
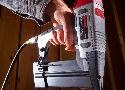
18-gauge brad nailer
If you plan to buy only one trim nailer, this is the size to get. I use mine more than all my others combined. It’s perfect for standard trim, furniture making and odd jobs around the shop. Models that shoot brads up to 1-1/4- in. are common, but I strongly recommend spending a few bucks more for a gun that can handle brads up to 2 in. long. Name-brand 2-in. guns start under $100.
Use nails before screws
I always found it difficult to keep parts aligned when screwing cabinets together. Then I discovered that a couple of shots with my finish nailer or brad nailer will keep the parts aligned while I drill pilot holes and drive screws for strong joints.
Invisible nail holes with a pinner
Pins are tiny and headless, so they’re hard to see even before you fill them. Afterward, nobody but you will know they’re there.
Nail before you clamp
With a coat of slippery glue, parts will slide out of alignment while you’re desperately trying to clamp them. My solution is to tack the parts together with a couple of nails. That keeps the parts aligned while I apply serious pressure with clamps.
No stud? No problem
Studs aren’t always located where we need them. When I need to nail trim where there’s no stud, I dab some construction adhesive on the back of the trim and then drive nails into the drywall at 45-degree angles. That holds the trim tight against the wall while the adhesive cures. This “trap nailing” technique works fine with brad nailers and even better with finish nailers.
Episode 4: Build a Crosscut Sled - FineWoodworking
Build a Crosscut Sled
Multi-Use Tablesaw Rip Fence - FineWoodworking

In this short video, learn how supercharge your tablesaw with a rip fence that performs a wide variety of tasks more easily and safely than your standard fence.
Learn How to Build Your Own Supercharged Rip Fence
Learn how to build this auxiliary rip fence system—from start to finish. You can find complete assembly instructions in Fine Woodworking #231.
How to Stain Pine - Fine Homebuilding
Here’s what you will need:
Wipe-on polyurethane
Several clean rags
Oil-based gel stain in your desired color
A few pieces of very fine (320- or 400-grit) sandpaper
Here’s how to do it:
-
Use a rag to apply a thin, even coat of wipe-on-polyurethane to the surface of the wood and allow to dry.
-
Lightly sand the entire surface of the wood with 320- or 400-grit sandpaper, just enough to break the sheen and smooth out any high spots.
-
Apply a second coat of polyurethane.
-
Once dry, use a small rag to apply an oil-based gel stain. Apply perpendicular to the grain, then switch to a circular motion to fully work it into the surface.
-
Once the surface is completely covered, allow the applied stain to rest for 2 to 5 minutes, then use a clean rag to wipe off excess stain, and allow it to dry completely.
Video Vault: Installing Drawer Slides - Fine Homebuilding
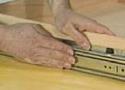
Turn case on its side to install!
Create a pattern - slide should be about 1/4" above bottom of case
Can the Can(ned) Shellac
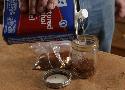
Canned shellac is convenient, but if you want more control over your finish you’ll need to mix your own. In this video, executive art director Mike Pekovich shows you how easy it is to make a batch of shellac from flakes.
-
Make a heavy cut (top flakes off with alcohol) and then dilute as needed
-
Finish with steel wool #0000 and paste wax
https://www.finewoodworking.com/issue/2016/07/septemberoctober-2016-issue-no-256