How to build modern furniture : Dal Fabbro, Mario, 1913- : Internet Archive

214 p. 26 cm
How a Handplane Cuts - FineWoodworking

In this short video, furniture maker Garrett Hack explains how a handplane cuts as well as a number of other aspects of the tool.
- Tighten the throat!
- Low angle - bevel up
I Restored a 1950's Boston "Champion" Pencil Sharpener - Reddit
Finished! Ready for the next generation of pencil sharpening! I made a full restoration video of the project which can be found at the link below.
https://youtu.be/EZUwunWWCLA
Tips for Ripping Wood
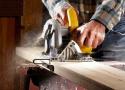
Build a Push Sled
To make a push sled, rip your board as you normally would by sliding it against the fence extension. When you get within reach of your push sled, hook the sled behind the board you're ripping and push it through, just like you would if you were using a regular push stick.

How to Make Box Joints with Only a Router | Woodworking Jig
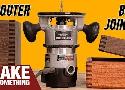
How to make finger and box joints with only a router. No table saw necessary! Brought to you by Squarespace. For 10% off your first purchase, go to: http://squarespace.com/makesomething
Hardwood from Kencraft:
https://goo.gl/pCyB95
How to make box joints (sometimes called finger joints) using only a router. Making box joints on the table saw requires a dado stack which isn’t available in all areas. The next best method is at the router table but not everyone has the space for a dedicated router table. This tutorial video shows a simple method on making a jig out of plywood for a hand held router that attaches to the base. Once you make this woodworking jig you’ll always be set up for box joints and finger joints. If you choose to change up your box joint finger width you’ll need to swap out the bit and make a dedicated fence for that bit.
How to Make Easy Box Joints - Finger Joints
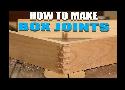
Box joints are an easy yet effective joinery method! Box joints, or sometimes referred to as finger joints, can be cut with a regular table saw blade or with a dado stack of your preferred width. The ones featured in the video are cut at 1/4" wide and were perfect for my current shop project, which will be a wall hanging router bit storage cabinet.
** Other videos on youtube
Don't use 3/4" Plywood - Use 1/2" instead
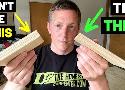
DON'T USE 3/4" PLYWOOD If You Don't Need It...TRY THIS! (1/2" Plywood Vs. 3/4" Plywood--When to Use)
Many new woodworkers and DIYers rush to use 3/4" plywood for any small project. But, in many cases, 3/4" plywood is overkill! This short video from The Honest Carpenter will show you a better alternative for many DIY projects--1/2" plywood!
1/2" plywood comes in nearly every variety that 3/4" plywood does. It's extremely strong and stable.
Many people seem to avoid 1/2" plywood on the assumption that it's weak. But, it has many of the same properties as 3/4" plywood.
(3/4" is a much more common measurement for wood in general--this may be one of the reasons that people assume that they need to purchase 3/4" plywood.)
BENEFITS OF 1/2" PLYWOOD:
--It's lighter (by almost 20 lbs. per sheet)
--It's cheaper (by $10-12 on overage per sheet)
--It's easier on tools
--It produces less sawdust
--It is easier to handle and manipulate
--It has an edge just wide enough to be hit with brads and trim nails
SITUATIONS WHERE 3/4" PLYWOOD IS PREFERRED:
--Anything that will be walked on
--Anything that will be hit hard with tools
--Anything that will be roughly handled.
TIPS FOR WORKING WITH 1/2" PLYWOOD:
--Try not to span it more than 24" unsupported in any direction
--Get support directly beneath the edges
--Use glue when bonding pieces
--Use face frames for additional support on trim projects
Thanks for watching! Be sure to check us out at The Honest Carpenter Website:
www.thehonestcarpenter.com
This Jig Is A Two For One! Accurate and Repeatable! Make one Today!
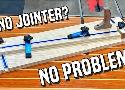
jointer and angle table saw jig
Saturday Morning Workshop: Folding Mobile Workbench
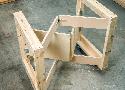
Build this handy mobile workbench that folds up to only 7 in. You only need two hours, some 2x4s, 3/4-in. plywood and 8’ of 1x4.
Polyurethane looks horrible (bumpy) | Family Woodworking
I put the first coat of polyurethane on some oak plywood shelves last night, and it turned out horrible. The surface has a bunch of little tiny rough bumps...
Oil based poly, especially the typical brands at the big box stores, is way too thick to be applied by brush by most of us mere mortals. And stretching the finish over a larger area in order to obtain a thin coat exacerbates the problem even more. It is just too thick to level on its own if you over work it even slightly.
Even though the can will likely tell you not to thin it, thinning with mineral spirits or naphtha even 10% by volume will vastly improve its ability to level on its own. Naphtha flashes off faster giving the film less time to collect dust nibs, one cause of the bumps you talk about.
Poly on the first two coats does feel bumpy but the more coats with proper treatment between coats will be very smooth.
Limbert Chair | Woodworking Project | Woodsmith Plans
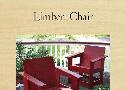
Designed from an original Arts & Crafts chair by Charles Limbert.
Hand-Screw How-To - FineWoodworking
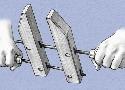
Wooden hand screws are versatile, but they can be confounding to use. We'll help you eliminate frustration and show you a few tricks to get the most from these clamps.
The trick is to always hold the top handle in your left hand and the bottom handle in your right hand. When you tighten the clamp, you only spin the handle in your right hand, which is much easier to control than spinning both handles. Plus, if you hold the clamp like this on a consistent basis, you build muscle memory and soon you won’t even have to think about which direction to turn the clamp to get it to tighten or loosen. I struggled with these clamps for years until I realized that I wasn’t holding the clamp consistently, so I never knew which direction would tighten or loosen the clamp.
Use an inner tube to clamp weird glue-ups - FineWoodworking
In issue #285, Clark Kellogg assembles the sides of his hexagon boxes with some innovative clamps from an unlikely source: a bike shop.
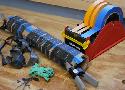
Learn a fast, reliable way to sharpen a card scraper - FineWoodworking
Card scrapers are incredibly versatile, making them an essential part of my surfacing kit for any project. Learn how to sharpen card scrapers, here.
HOW TO USE A HANDSCREW CLAMP LIKE A PRO
#2 – A Handscrew Is a Stop Block, Too
My drill press fence has a built-in stop block, but for some tasks I need a second stop block. On those occasions, I simply clamp a handscrew to the fence at the desired position.
#5 – Turn a Handscrew into a Bench-Top Vise
Did you know you can plane a long board held in a bench vise without the need for a deadman? Here’s how. First, glue or screw a board as a wing to the side of the outer jaw of a handscrew. Then, secure one end of the workpiece in the handscrew and clamp the wing in the vise. Now, you have a benchtop vise working for you!
I Bet You Don't Know At Least ONE Of These Blue Tape Tricks
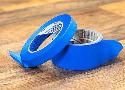
- Add a flag when wrapping around a drill bit - stop when flag blows away sawdust
- Put on wood before drilling holes - Mark on tape, not on wood!
- Wrap around piece before sawing on miter saw to avoid tear-out
- Tape piece to bench for extra hand / clamp
- Use tape as epoxy dispenser
- Mark start and stop on router table (and miter saw??)
- Mask off work before gluing to avoid drips
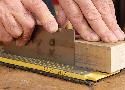
Ep 4: Hand-cut pins with a twist - FineWoodworking
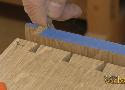
Mike Pekovich makes blue tape an integral part of his dovetailing technique.
Outside of sawing technique, most dovetailing issues can be traced back to a bad transfer from the tail board to the pin board. In this video, after having already sawed the tail board, Mike demonstrates the blue-tape technique, which makes transferring as simple as can be.
Bolt Depot - Pilot Hole Sizes for Wood Screws
Lots of other useful information for finding sizes of screws and washers
Video: Organize your hardware, organize your shop - FineWoodworking
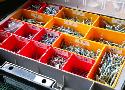
Medium-size storage for bits and bobs
I made my red boxes out of wood and kicked them up a notch by making them in three different sizes, 6 in., 12 in, and 18 in. wide.
Bench Grinder Basics - FineWoodworking
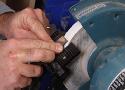
By Asa Christiana #226–May/June 2012 Issue
- ceramic alumina wheels
- diamond dresser