Finish Nailer Tips | Family Handyman

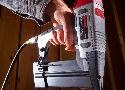
18-gauge brad nailer
If you plan to buy only one trim nailer, this is the size to get. I use mine more than all my others combined. It’s perfect for standard trim, furniture making and odd jobs around the shop. Models that shoot brads up to 1-1/4- in. are common, but I strongly recommend spending a few bucks more for a gun that can handle brads up to 2 in. long. Name-brand 2-in. guns start under $100.
Use nails before screws
I always found it difficult to keep parts aligned when screwing cabinets together. Then I discovered that a couple of shots with my finish nailer or brad nailer will keep the parts aligned while I drill pilot holes and drive screws for strong joints.
Invisible nail holes with a pinner
Pins are tiny and headless, so they’re hard to see even before you fill them. Afterward, nobody but you will know they’re there.
Nail before you clamp
With a coat of slippery glue, parts will slide out of alignment while you’re desperately trying to clamp them. My solution is to tack the parts together with a couple of nails. That keeps the parts aligned while I apply serious pressure with clamps.
No stud? No problem
Studs aren’t always located where we need them. When I need to nail trim where there’s no stud, I dab some construction adhesive on the back of the trim and then drive nails into the drywall at 45-degree angles. That holds the trim tight against the wall while the adhesive cures. This “trap nailing” technique works fine with brad nailers and even better with finish nailers.