Everything You Need to Know About Recessed Downlights - Fine Homebuilding


Learn about the best recessed downlights for every budget as well as how to understand and install recessed downlighting in any environment.
https://www.finehomebuilding.com/2023/12/21/the-science-and-art-of-better-home-lighting
Downlights for Under $75
Sadly, most homes use $20 disk lights for illumination everywhere. The first step toward higher-quality light is a higher-quality fixture, but that means spending more money. These fixtures are a step up from disk lights, but they still emit more glare than I like.
Fine Homebuilding #327 (11/2024)
Window and Door Flashing Guide - Fine Homebuilding
This collection of articles and videos will help you find the materials and construction details you need for a leak-free installation of doors, windows, siding, and more.
How to Fine-Tune Door Hinges - Fine Homebuilding

Whether the door is new or old, Tucker Windover's technique produces a perfectly aligned door that closes properly and stays shut.
To learn more about Windover’s technique, read Hinge Adjustment for a Door’s Final Fit from Fine Homebuilding Issue #192 (Dec 2007/Jan 2008), pp.110-117.
https://www.finehomebuilding.com/2007/11/06/hinge-adjustment-for-a-doors-final-fit
2 Rules for Building Comfortable Stairs - Fine Homebuilding

As the rise goes down, the run needs to go up correspondingly, or vice versa.
To summarize:
The rise plus the run (r+R) should be within an inch of 18”.
Twice the rise plus the run (2r+R) should be within an inch of 25”.
IRC code limit stair:
rise r ≤ 7 3/4″
run R ≥ 10″
r+R = 17 3/4″ (good)
2r+R = 25 1/2″ (within range)
→ stair will be comfortable
Frame a Door Rough Opening - Fine Homebuilding
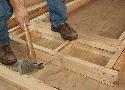
Oregon builder, Scott Grice, teaches you his 3 simple rules for framing door rough openings efficiently. Grice begins the process by marking all the plates at the same time; the plates are marked with the trimmer, stud, header, and cripple locations.
By Scott Grice Issue 201
Video Series: How to Install Interior Extension Jambs and Window Trim - Fine Homebuilding

Remodeler Mike Sloggatt finishes off this replacement-window project and teaches you how to install interior extension jambs.
Laying Out Basic Stair Stringers - Fine Homebuilding
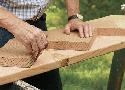
1. Clamp a guide to the square.
To make it easy to align the framing square on the stringer consistently, clamp a straight wood strip to the square. On the outer edges of the square, align the strip with the run dimension on one leg and the rise dimension on the other.
2. Find the crown.
Sight down the edge of the stringer stock to determine if it crowns. If it does, lay out the stringer so that the crown on the completed stair will face upward.
3. Lay out the first tread and the second riser.
Hold the square so that the leg with the tread dimension is closest to the end of the stringer stock but far enough from the end to allow for a riser below. Try to lay out the notches so that cutting them gets rid of knots and defects.
https://www.finehomebuilding.com/2013/10/15/lay-out-accurate-stair-stringers-with-this-custom-tool
By Andy Engel Issue 248 - Dec/Jan 2015
Making Sense of Minisplits - Fine Homebuilding

For well-insulated houses, minisplits are beginning to dominate the market. They are especially suited for lower heating and cooling loads and providing quiet comfort with surprisingly low amounts of energy—energy that can be produced on-site or pulled from renewable sources on the grid.
Minisplits have a few disadvantages and downsides, and they are interrelated, combining to make or break the minisplit decision. The big three are the price of electricity, the severity of the winter, and the quality of the building envelope.
From Fine Homebuilding #296
Restore a Wood Entry Door - Fine Homebuilding

By Sean Clarke Issue 225
I’ll show you how to prep a wood door properly whether it has been painted or varnished, how to make minor repairs, how to apply an epoxy sealer, and finally, how to build up a varnish finish that yields a durable, clear shine.
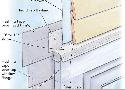
The Britches Method: A Simple Template for Outside Skirt Returns - Fine Homebuilding
Ever wondered how to lay out an outside skirt board when building stairs? This was one of those processes that was a trade secret when I started. I’ve had a few variations on this over the years, but this is my favorite way to go! This method is the Britches Method.
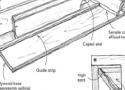
The Secret to Coping Crown Molding - Fine Homebuilding
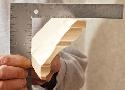
My favorite way to establish a guideline is to use a 2-ft.-long piece that’s coped accurately and a 2-ft.-long square-cut piece. Fitted in the corner, the coped piece locates the square piece at the correct projections, and you can mark the top and/or bottom. The longer pieces take into account more of the wall and ceiling conditions than small gauge blocks.
How to Make a Crosscut Sled for Your Tablesaw - Fine Homebuilding
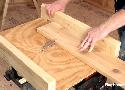
Note: the project in this video is a down-and-dirty job-site project for when you need a crosscut sled in a pinch; if you have the time, tools, and materials to build something more refined, read the article “Build a Tablesaw Crosscut Sled” from Fine Homebuilding issue #180.
How to Stain Pine - Fine Homebuilding
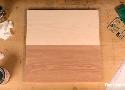
Here’s what you will need:
Wipe-on polyurethane
Several clean rags
Oil-based gel stain in your desired color
A few pieces of very fine (320- or 400-grit) sandpaper
Here’s how to do it:
-
Use a rag to apply a thin, even coat of wipe-on-polyurethane to the surface of the wood and allow to dry.
-
Lightly sand the entire surface of the wood with 320- or 400-grit sandpaper, just enough to break the sheen and smooth out any high spots.
-
Apply a second coat of polyurethane.
-
Once dry, use a small rag to apply an oil-based gel stain. Apply perpendicular to the grain, then switch to a circular motion to fully work it into the surface.
-
Once the surface is completely covered, allow the applied stain to rest for 2 to 5 minutes, then use a clean rag to wipe off excess stain, and allow it to dry completely.
Video Vault: Installing Drawer Slides - Fine Homebuilding

Turn case on its side to install!
Create a pattern - slide should be about 1/4" above bottom of case