Daily Shaarli
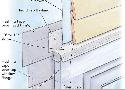
This collection of articles and videos will help you find the materials and construction details you need for a leak-free installation of doors, windows, siding, and more.
While coming up with this design, I had three goals in mind:
-
Build a raised bed that would be functional for growing vegetables (holding soil at least 18” deep) and would also support an 8’ high trellis for privacy.
-
Stick to a design that would require only tools I already owned. Since my power-tool collection is more the homeowner variety than a carpenter’s workshop, this meant a drill and chop saw. (You could also get by with a circular saw.)
-
Finally, to adjust the design so it would maximize the yield I could get from dimensional deck/fencing – lumber available at my local home center.
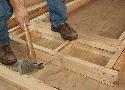
Oregon builder, Scott Grice, teaches you his 3 simple rules for framing door rough openings efficiently. Grice begins the process by marking all the plates at the same time; the plates are marked with the trimmer, stud, header, and cripple locations.
By Scott Grice Issue 201

Whether the door is new or old, Tucker Windover's technique produces a perfectly aligned door that closes properly and stays shut.
To learn more about Windover’s technique, read Hinge Adjustment for a Door’s Final Fit from Fine Homebuilding Issue #192 (Dec 2007/Jan 2008), pp.110-117.
https://www.finehomebuilding.com/2007/11/06/hinge-adjustment-for-a-doors-final-fit
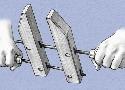
Wooden hand screws are versatile, but they can be confounding to use. We'll help you eliminate frustration and show you a few tricks to get the most from these clamps.
The trick is to always hold the top handle in your left hand and the bottom handle in your right hand. When you tighten the clamp, you only spin the handle in your right hand, which is much easier to control than spinning both handles. Plus, if you hold the clamp like this on a consistent basis, you build muscle memory and soon you won’t even have to think about which direction to turn the clamp to get it to tighten or loosen. I struggled with these clamps for years until I realized that I wasn’t holding the clamp consistently, so I never knew which direction would tighten or loosen the clamp.
By Bob Van Dyke #237–Tools & Shops 2014 Issue
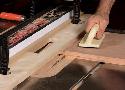
Bob Van Dyke’s simple L-fence simplifies the cutting of rabbets, tenons, patterns, and much more. Learn how to make a versatile tablesaw L-Fence, here.
Last summer, I needed to repair my deck. After completing the necessary work, I had a small stack of new-lumber offcuts and old, left-over deck boards. Instead of taking the wood to the landfill, I made a small garden bench that can be easily moved from the deck to other parts of the yard. I settled on a finished height of 18” and determined the width of the seat by using three boards with ¼” spacing. The length of the old boards determined the length of the bench, which in this case was 5’.
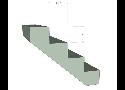
As the rise goes down, the run needs to go up correspondingly, or vice versa.
To summarize:
The rise plus the run (r+R) should be within an inch of 18”.
Twice the rise plus the run (2r+R) should be within an inch of 25”.
IRC code limit stair:
rise r ≤ 7 3/4″
run R ≥ 10″
r+R = 17 3/4″ (good)
2r+R = 25 1/2″ (within range)
→ stair will be comfortable