Router Edge Guide: 6 Tips for Perfect Edges| Family Handyman

Modern router bits with carbide cutters and guide bearings make forming wood edges almost foolproof. Try this router edge guide for tips.
-
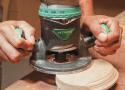
Router bits spin clockwise as you look down on the router, so moving the router counterclockwise tends to pull the pilot bearing tight against the wood and allows easy control of the router. When you’re routing the outside perimeter of a board, move the router counterclockwise. However, when you’re routing the inside of something like a picture frame, move the router in a clockwise direction.
-
Secure Small Work With Hot-Melt Glue
-
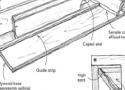
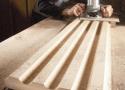
Make Moldings With Your Edge Router
Finish Carpentry Tips Every DIYer Should Know | Family Handyman
Trimwork can be challenging to install. Here are some tips to help you handle the most troublesome situations that finish carpentry poses.
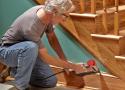
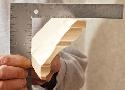
Tighten Up Open Miters
The quickest and easiest way to cut a slight back bevel is to shim the molding so it’s resting at an angle to the saw blade. A pencil makes a handy shim and is just about the right thickness.
Cut Steep Angles on Your Miter Saw
It’s not common, but occasionally you’ll run into a situation that requires miters greater than the 45- or 50-degree angle available on miter saws. An easy way to handle this is to cut a block of wood at a 45-degree angle and cut a flat spot for the clamp. Clamp the molding to the block and line up the miter saw with the mark to make the cut.
Scribe Trim to Fit Uneven Walls
Angle a Nail to Close Baseboard Gaps
Make Blocks for Tough Transitions
Big Humps Require Surgery
A stud that’s not lined up with the plate causes a big hump in the wall, making it difficult to get the baseboard tight.
Clean Out Corners Before You Start
Keep Baseboard from Tipping
Cut strips of wood to the thickness of the drywall and cut off small pieces to use as spacers at inside corners or wherever they’re needed.
Join Moldings with Biscuits
6 Tips for Painting Interior Woodwork | Family Handyman
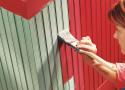
Brushing a silky smooth finish on woodwork takes patience and attention to detail. We'll show you how to use the techniques that pros use to paint wood.
For dents and chips deeper than about 1/8-in., use a two-part polyester resin. It sticks well, doesn’t shrink and sands easily. It’s also the best material for rebuilding chipped corners. Auto body fillers also work well.
Sand the painted surface with 100- or 120-grit sandpaper or a medium sanding sponge. Then, finish-sand with 180-grit sandpaper or a fine sanding sponge. Spot-prime the filler and any bare wood with a latex primer.
We recommend you use an additive that slows the drying process and helps the paint lie smooth. (Floetrol is one common choice.)
Quickly coat an area with several brush loads of paint, and then blend and smooth it out by lightly running the unloaded brush tip over it (called “tipping”). Try to coat a whole board or section, but don’t let the paint sit more than a minute before tipping.
It's like cheating

Why is it that the miters sometimes looks awful even though you've done everything to the book? This might be the answer your looking for.
Dial Gauge: https://shorturl.at/lKVZ6
Cut the miters using the digital level cube and set the angle to 44.9º so there will be a very small gap at the back.
10 Tips for Using MDF Wood | Family Handyman
MDF (medium-density fiberboard) is inexpensive, durable, and a good choice for many woodworking and carpentry projects. Learn how to use it correctly, and how to avoid common mistakes.
- Make Your Own Trim
- Combine MDF With Wood Moldings
- Prepare for a Dust Storm
- Avoid Full Sheets
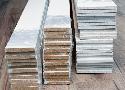
Try MDF shelving, usually in 1 x 8-ft. sections. I like to slice these long, easy-to-handle shelves into trim stock. - Sand, Prime, Sand (Kilz, 100 grit)
- Don’t Let It Get Wet
- Reinforce MDF Shelves
- Don’t Use a Hammer (drill holes first or use a trim nailer)
Tips for Saving Money by DIYing Trim
Save hundreds by making your own DIY trim. Here's how to do it.
Here at the Getaway, we kept it simple and made all our trim 1/2-in. thick. With some basic DIY skills, you can make your own trim for your 10-ft. x 14-ft. room for $28 from just one 4×8 sheet of 1/2-in. MDF.
The Secret to Coping Crown Molding - Fine Homebuilding
My favorite way to establish a guideline is to use a 2-ft.-long piece that’s coped accurately and a 2-ft.-long square-cut piece. Fitted in the corner, the coped piece locates the square piece at the correct projections, and you can mark the top and/or bottom. The longer pieces take into account more of the wall and ceiling conditions than small gauge blocks.