Finish Carpentry Tips Every DIYer Should Know | Family Handyman

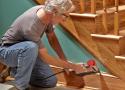
Trimwork can be challenging to install. Here are some tips to help you handle the most troublesome situations that finish carpentry poses.
Tighten Up Open Miters
The quickest and easiest way to cut a slight back bevel is to shim the molding so it’s resting at an angle to the saw blade. A pencil makes a handy shim and is just about the right thickness.
Cut Steep Angles on Your Miter Saw
It’s not common, but occasionally you’ll run into a situation that requires miters greater than the 45- or 50-degree angle available on miter saws. An easy way to handle this is to cut a block of wood at a 45-degree angle and cut a flat spot for the clamp. Clamp the molding to the block and line up the miter saw with the mark to make the cut.
Scribe Trim to Fit Uneven Walls
Angle a Nail to Close Baseboard Gaps
Make Blocks for Tough Transitions
Big Humps Require Surgery
A stud that’s not lined up with the plate causes a big hump in the wall, making it difficult to get the baseboard tight.
Clean Out Corners Before You Start
Keep Baseboard from Tipping
Cut strips of wood to the thickness of the drywall and cut off small pieces to use as spacers at inside corners or wherever they’re needed.
Join Moldings with Biscuits
How to Install Surface-Mounted Wiring and Conduit | Family Handyman

Adding a new light or receptacle to your garage or basement is easier than you think.
Always work from the power source to the end of your pipe run. That way, you always have an “open” end of the conduit for adding boxes and fittings. (It’s really hard to jam a piece of pipe in between existing, attached boxes.) Remove the existing box from the stud. If you have extra Romex in the wall, great! Pull it through the hole.
Why You Should Be Washing Your Walls Regularly
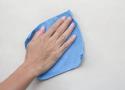
Cleaning your walls doesn't often make your to-do list. Did you know you should be cleaning your walls regularly? Here's why, and how often.
Benefits To Cleaning Your Walls With a Mop
You don’t need much to effectively clean your walls:
- Microfiber flat mop with telescoping handle;
- Household mop bucket;
- Dishwashing liquid, such as Dawn,
- Neutral-pH floor cleaner like Mr. Clean;
- Microfiber cloth or sponge for spot cleaning.
What To Know About PEX Pipe Connections | Family Handyman
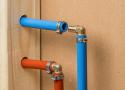
Have a plumbing job coming up? PEX pipe is well worth considering, and learning how PEX connections work is the first step to plumbing success.
How to Build Deck Stairs (DIY) | Family Handyman

Building deck stairs can be tricky. But in this story, we'll make it easy by showing you how to build stairs by estimating step dimensions.
How to Build a Fence Gate (DIY) | Family Handyman
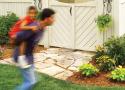
This article tells how to build a durable, good-looking fence, from start to finish, as well as how to build a gate that works perfectly.
The key to our no-sag gate is using panel boards that are angled at 45 degrees. Each functions as a brace to keep the panel from sagging over time. The outer frame on each side also overlaps in opposite ways at each corner to make the gate even more solid.
Here’s the secret to hanging gates successfully. With the gates spaced 1/2 in. apart on the ground, screw two 2×4 or 2×6 “holding” boards to the gates, overhanging the ends several inches. Then carry the assembly over to the opening and rest it on blocks at each end.
10 Tips for Better Drywall Taping | Family Handyman

Whether you're finishing a basement, repairing a damaged wall, or hanging drywall in a new house, these taping tips will help you make smooth, invisible seams, even at inside corners.
Hide butt joints!
Hanging drywall vertically is slower than hanging it horizontally because you have to make sure the tapered edges fall at the centers of the studs.
Use Mesh Tape
But mesh tape has one weakness (literally): It’s not as strong as paper. To compensate, you have to cover it with a setting-type joint compound, which is stronger than a premixed compound.
Setting-Type Compound
Be sure to choose a “lightweight” setting compound. Other versions become so hard that sanding away mistakes is nearly impossible. Even the lightweight versions are harder to sand than the premixed compound, so it’s best to use a setting compound for the first coat and a premixed compound for later coats.
Flatten Bumps and Bulges
If you used a setting-type compound, inspect the joints before the compound has hardened completely. Run a 12-in. wide knife over every joint. The blade will scrape off small ridges and nubs. More important, it will act as a straightedge, revealing larger bumps and bulges. When the compound is about the consistency of a bar of soap, you can easily shave down bulges without gouging. You can sand and scrape the setting compound after it’s completely hard, but that’s more work.
Smooth the Surface With a Knockdown Knife
Then drag the knockdown knife gently over the surface in one continuous pass. Apply light, even pressure and don’t stop or hesitate.
Although the rubber blade is soft, it can still make a mess of partially hardened compounds. Knockdown knives are available in 18 and 22-in. widths at drywall suppliers and some home centers and hardware stores. A 22-in. version is best for butt joints.
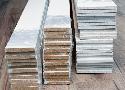
10 Tips for Using MDF Wood | Family Handyman
MDF (medium-density fiberboard) is inexpensive, durable, and a good choice for many woodworking and carpentry projects. Learn how to use it correctly, and how to avoid common mistakes.
- Make Your Own Trim
- Combine MDF With Wood Moldings
- Prepare for a Dust Storm
- Avoid Full Sheets
Try MDF shelving, usually in 1 x 8-ft. sections. I like to slice these long, easy-to-handle shelves into trim stock. - Sand, Prime, Sand (Kilz, 100 grit)
- Don’t Let It Get Wet
- Reinforce MDF Shelves
- Don’t Use a Hammer (drill holes first or use a trim nailer)
Before and After Spray Paint Photos That Will Blow You Away
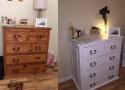
Looking for an easy DIY project? You won't believe these before-and-after spray paint photos!
Tips for Ripping Wood
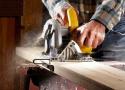
Build a Push Sled
To make a push sled, rip your board as you normally would by sliding it against the fence extension. When you get within reach of your push sled, hook the sled behind the board you're ripping and push it through, just like you would if you were using a regular push stick.

Homeowner's Guide to Drywall | Family Handyman

A drywall expert reveals some of his best tips and tricks so you can handle the job like a pro.
Bend your blade
You don’t want your blade to be perfectly flat. Bend your blade so it has a slight curve, and mark the concave side so you always know which side is which. Josh will use the convex side to feather out the edge of the joint, and the concave side to float over the joint.
Consistency of yogurt
Butt joints made easy
Drywall sheets have depressed edges that account for the thicknesses of tape and mud. When you cut a sheet, you lose that edge. On a piece of pine, Josh cuts a concave shape on one side with the table saw blade set to two degrees. This helps pull the edges of drywall in, forming a valley for tape and mud. This creates seamless joints between studs.
Staple and Tape your corner bead
Tearaway bead for exposed edges
Whenever drywall meets another surface like stone, brick or paneling, you need a way to neatly finish the edge. Tearaway bead gets you pro results with minimal effort. It attaches just like corner bead, but the compound is applied just up to the back edge. Once it dries, the tearaway strip easily pulls off, leaving a nice, finished edge.
Installing Window Trim the Easy Way: MDF Trim Molding (DIY)
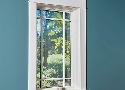
Don't let the elegant look fool you. This trim is actually easier than the standard 'picture frame' trim used in most homes since the 1950s.
For this project, you'll need 1/2-in.- and 3/4-in.-thick MDF, and some paintable 1x3 lumber for the stools. We recommend wood for the stool because unlike MDF, it'll withstand a little moisture from window condensation. We used pine, but poplar, maple and birch would also work well.
You can figure out how much material you need using your cutting list, but as a rough estimate you can cut parts for about four or five windows from one 4 x 8-ft. sheet of MDF. MDF is heavy, and full sheets are hard to handle. Ask to have the sheets cut in half lengthwise at the home center.
Basic router bits: roundover, ogee, cove
7 Best Pull-Out Cabinet Organizers You Can DIY | Family Handyman

Add rollouts to your kitchen drawer cabinet to maximize storage space, provide easier access, streamline your cooking, save your back.
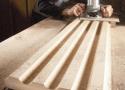
Tips for Saving Money by DIYing Trim
Save hundreds by making your own DIY trim. Here's how to do it.
Here at the Getaway, we kept it simple and made all our trim 1/2-in. thick. With some basic DIY skills, you can make your own trim for your 10-ft. x 14-ft. room for $28 from just one 4×8 sheet of 1/2-in. MDF.
How to Install a Paver Patio Base
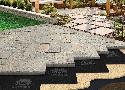
Let plastic paver patio base panels take the place of the gravel base to eliminate tons of labor.
Paver patio base panels are made from lightweight high-density polypropylene. The panels typically have tongue-and-groove or shiplap edges to keep the panel edges flush with one another. You may wonder how a thin plastic mat can effectively replace a 6-in.-deep layer of compacted gravel. The answer is that the panels spread out the load, so the weight of a person walking on the patio is distributed more widely. Distributing the load puts less pressure on the soil and prevents the paver bricks from becoming uneven.
20 Marking Hacks Every DIYer Should Know
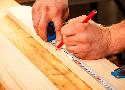
Here's a collection of 20 astounding hacks that'll help make your marking more accurate and your days more productive.
- Tack Trim in Place While Marking
- Don’t Trust Factory Edges
- Use a compass for scribing
- Circles (with a speed square and nail)
- Flashlight as plumb bob!
- Isometric graph paper
Saturday Morning Workshop: Folding Mobile Workbench
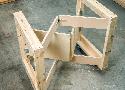
Build this handy mobile workbench that folds up to only 7 in. You only need two hours, some 2x4s, 3/4-in. plywood and 8’ of 1x4.
Family Handyman DIY University: home repair online classes
Sharpen your home repair DIY skills with online home improvement classes from the experts. Learn more today and start building more tomorrow at DIY University!
How to Set Fence Posts That Won't Rot (DIY) | Family Handyman
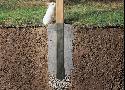
Did your fence posts rot at the bottom? Here's how to install new ones—and avoid the problems that made your old posts rot.
- Treat the Post With Preservatives (Cuprinol)
- Place about 6 inches of aggregate in the bottom of the posthole to allow for drainage.
What You Need to Know About a Home’s Crawlspace

The crawlspace is often an out-of-sight, out-of-mind part of a home. But there are things to know, including how to utilize that space.