Note: Test note

This is a note to call ideal fence
This is in bold
This is in italic
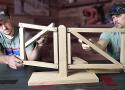
The Only Way To Brace A Gate
Grab an Anti-Sag Kit here 👉🏻 https://bit.ly/anti-sagkit
This is incredibly simple, but TONS of people get this wrong. Mess this one thing up and your gate brace is almost completely non-functional.
How to Build a Fence Gate (DIY) | Family Handyman
This article tells how to build a durable, good-looking fence, from start to finish, as well as how to build a gate that works perfectly.
The key to our no-sag gate is using panel boards that are angled at 45 degrees. Each functions as a brace to keep the panel from sagging over time. The outer frame on each side also overlaps in opposite ways at each corner to make the gate even more solid.
Here’s the secret to hanging gates successfully. With the gates spaced 1/2 in. apart on the ground, screw two 2×4 or 2×6 “holding” boards to the gates, overhanging the ends several inches. Then carry the assembly over to the opening and rest it on blocks at each end.
How to Set a Corner Post WITHOUT Concrete!
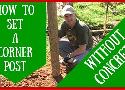
How to Set a Corner post WITHOUT Concrete!
How to set a corner post WITHOUT using concrete!! Save money, and time...your corner post will be ready for pulling fence as soon as you're done -- no waiting for concrete to dry! And to remove the post, simply reverse the process and it'll come right up!
"Key" fence by using a 2x6 or 2x4 next to the post in the hole.
How To: Building A Scallop On A Wood Fence – America's Fence Store

Objective: By mastering this lesson, you will be able to build the most popular wood fencing that is both pleasing to the eye and functional. Equipment: Tape measure, 12’ piece of plastic conduit, string line, circular saw, and tape measure.
Scallops generally reflect an 8” deflection overall.
Concrete is a no-no for fence posts

It has been awhile since I wrote about fence posts, but a buddy asked about replacing some a few weeks ago, so I decided it was time again.
- First rule, gang: Do not set wooden posts in concrete.
- Dig a hole as close in diameter as you can to the diameter of the post. You want as little wiggle room as possible.
-
Dig deep. Measure the post and plan on burying at least a third of it. For a 5-foot fence, you’d want an 8-foot post and you’d need a 3-foot hole. Don’t cheat by cutting the post shorter.
-
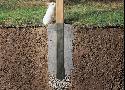
Before you set the post in the hole, place a rock or broken chunk of concrete in the bottom — pointy end up if possible. That little footing will give the post something to stand on instead of damp soil.
-
Set the post in the hole and brace it plumb (or put a helper on the job) and in line and level with the posts you’ve already set.
If you remember to set the corner posts first, it makes it easy to run string lines between them. -
Slowly shovel in equal parts crushed rock or sharp gravel and soil, tamping between layers, until you get to ground level. For years I’ve been using an oddly curved length of 2-by-2 to tamp with. Many use an upended shovel. All that’s needed is something long and fairly narrow.
-
When you get to ground level, pour enough of your dirt and rock mix around the post to tromp it down and make a little hill so rain will run away from the post.
-
End-grain is the enemy, which was the reason for installing that little rock “foundation” under the post. It holds that end-grain above whatever moisture might collect at the bottom of the post hole.
How to Set Fence Posts That Won't Rot (DIY) | Family Handyman
Did your fence posts rot at the bottom? Here's how to install new ones—and avoid the problems that made your old posts rot.
- Treat the Post With Preservatives (Cuprinol)
- Place about 6 inches of aggregate in the bottom of the posthole to allow for drainage.